How to use Send2
To download Send2 please go to: http://send2.4team.biz/
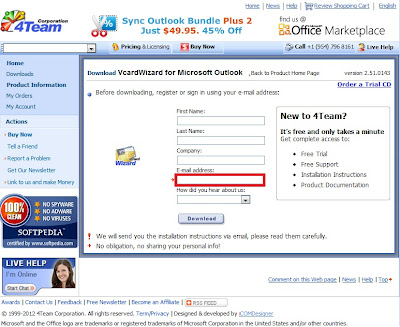
Click on “Try the new updated Send2 for FREE Now!”, enter your email address and press the “Download” button:

After installation you will see Send2 icon on the Outlook toolbar:

To start using Send2, you need to create Distribution List first. You can create a Distribution List by selecting 1 of 3 buttons:

After you click “Create new Distribution List” button, new dialog will appear. You need to click “Select Members” button and select recipients you want to add to the list.

You can also create a Distribution List using this button:

After you select this button, you will receive a warning dialog:

When Send2 add recipients to a Distribution List you will be able to enter Distribution List name:

You can add new recipients to existing Distibution List by clicking “Add to Existing Distrubution List” button:

To send a group email right click on the Distrubution List, select Send2 and select TO, CC or BCC:

Tip: Send2 Distribution List is placed in MS Outlook Contacts folder.
After you add Distribution List you will need to enter email body text and press “Send” button:

You can find Send2 options in New Email window:

Insert button allows to insert full name, first name and other in the email.

“Mode” button allows to select how to send group emails:

“Options” button opens a new tab:


“Options” button in Send2 menu will take to the same tabs as “Options” button in a New Email window:

“About Send2”: dialog will display information about the Send2 version you use, and options to: Deactivate the program, Buy Online, Check for Updates, Report a Problem, contact Tech Support or find the online documentation.


Click on “Try the new updated Send2 for FREE Now!”, enter your email address and press the “Download” button:

After installation you will see Send2 icon on the Outlook toolbar:
To start using Send2, you need to create Distribution List first. You can create a Distribution List by selecting 1 of 3 buttons:

After you click “Create new Distribution List” button, new dialog will appear. You need to click “Select Members” button and select recipients you want to add to the list.

You can also create a Distribution List using this button:

After you select this button, you will receive a warning dialog:

When Send2 add recipients to a Distribution List you will be able to enter Distribution List name:

You can add new recipients to existing Distibution List by clicking “Add to Existing Distrubution List” button:

To send a group email right click on the Distrubution List, select Send2 and select TO, CC or BCC:

Tip: Send2 Distribution List is placed in MS Outlook Contacts folder.
After you add Distribution List you will need to enter email body text and press “Send” button:

You can find Send2 options in New Email window:

Insert button allows to insert full name, first name and other in the email.

“Mode” button allows to select how to send group emails:

“Options” button opens a new tab:


“Options” button in Send2 menu will take to the same tabs as “Options” button in a New Email window:

“About Send2”: dialog will display information about the Send2 version you use, and options to: Deactivate the program, Buy Online, Check for Updates, Report a Problem, contact Tech Support or find the online documentation.


Comments
Post a Comment