How to use Email Responder

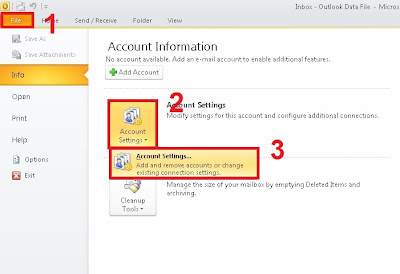
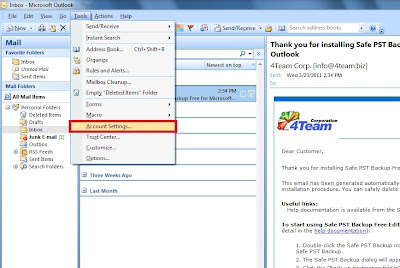
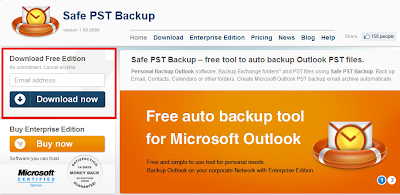
To download Email Responder please go to: www.e-mailresponder.com

Click on “Try Email Responder for Microsoft Outlook”, enter your email address and press the “Download” button:


After installation you will see the Email Responder icon on the Outlook toolbar:


To start using Email Responder, please click the program’s icon and press “Start and Enable Email Responder service”:


After you enable the program you will see this button:


To set a status and personalize templates click the “Manage Statuses and Templates…” button:


Select a status and uncheck all other statuses you do not need:


To edit the a template please press the “Edit Auto Reply template” button:


Tip: If the “Auto Reply” field is unchecked, auto replies will not be sent.
If the “Auto Forward” field is unchecked, emails will not be forwarded automatically.
Edit the template and save it:


To send auto responses according to your status press the “Status” button and select the a status you need:


If you do not need to send auto replies anymore, you have to disable Email Responder by clicking this button:


Email Responder menu:

“Status”: Allows changing statuses

“User Defined Status”: After clicking this button, you will be able to see custom statuses:

“Disable Email Responder”: Disables Email Responder from sending auto replies to all incoming emails.

“Enable Auto Forwarding”: Allows creating auto forwarding rules and selecting other options (Remote Access, Save/Retrieve Options, Other).

“Open templates folder”: Displays all Email Responder templates.

“Filters”: You can select sending notification to email received on particular accounts, from particular senders. You will be able to select not to send notification to email that have certain words in the subject as well.

To set filters, press the "Add" button and enter email address or particular words:


If you want to remove an email address or certain words from filters, you need to mark email address/words and press the "Remove" button:


“Manage Statuses and Templates”: You will be able to personalize templates and create your own statuses after clicking this button.

“Options”: takes you to the same options as the “Enable Auto Forwarding” button.

“Help”: allows finding the online Email Responder documentation easily.

“About Email Responder”: dialog will display information about the Email Responder version you use, and options to: Deactivate the program, Buy Online, Check for Updates, Report a Problem, contact Tech Support or find the online documentation.

How to restore the Outlook PST file backup on a new computer

Below are step by step instructions on how to restore the Outlook PST file backup on a new computer.

To find your Outlook default personal folder, open Outlook -> File -> Account Settings -> Account Settings...


In the open window select the Data Files tab and click Open File Location…


A new window will pop up showing you the location of your default personal folder. Minimize this window and close Outlook.


Locate the backup file on your computer. In this case, we can see it on the desktop.


Rename this backup file to ‘Outlook’.


Copy and paste your backup file to your personal folder location and select Move and Replace.


Open your Outlook. Your backup will be added to the Outlook folder list displaying all your backed up folders.

How to add the backup PST file as a secondary folder in Outlook

Below are step by step instructions on how to add the backup PST file as a secondary folder in Outlook.

To open your Outlook account settings, open Outlook -> Tools -> Account Settings...


In the opened window select the Data Files tab and click Add….


A new window will ask you to choose a type of storage. Keep the default one and press OK.


Choose a location where your backup file is saved. Click the PST file and press OK.


In the Name field enter a name for your PST file to be displayed in Outlook and press OK.


Your added data (PST) file will appear in the Data Files window. Press the Close button.


Your backup will be added to the Outlook folder list displaying all your backed up folders..

How to back up Outlook PST file using Safe PST Backup

Safe PST Backup performs PST file synchronization one way only – from your personal computer to a selected backup location.

This article explains how to back up your PST file using our free Safe PST Backup version.

You can download it at: http://www.safepstbackup.com/

Enter your email address and click the Download now button:


Double click on the program’s icon to open the main dialog:


Right-click – opens the pop-up menu as shown on the following screen:


Enter / Click the destination folder path to select a folder where the backed up data will be placed:


The destination folder path will be displayed.


Note: you will be able to change the destination folder by clicking on the path.

Click the “Start Backup” button to start the backup process


Click the “Stop Backup” button if you need to stop the process


The last backup information will be displayed along with the schedule of the next backup.


If you back up PST files manually, your information dialog will look like this:


You can schedule your backup at:


Note: please be aware that the free Safe PST Backup edition does not back up Exchange folders data. To back up OST files, you should purchase our Enterprise edition.


The Safe PST Backup free edition displays an advertising tab which will be removed in the Enterprise edition:


To run automatic backup in the background, click “Close”:


Please note that the program backs up PST files regardless of whether Outlook is running or not.


Safe PST Backup Enterprise edition.


The Safe PST Backup Enterprise edition has many additional features, e.g.: a custom backup schedule. We provide the .msi file which can be used to install the program for all users at once. You will be able to set a schedule when your PST file should be backed up . The program also allows you to back up MS Exchange or any Outlook folders separately. The Safe PST Backup Enterprise edition automatically contverts your OST files to PST format.

New Outlook Backup Solution

4Team is proud to announce the release of our long awaited Outlook backup solution.
It comes in two different versions: Free version providing simple functionality and intended for personal use and Enterprise Version with far more complex functionality providing backup over the network and more for corporate and advanced users.

Backup and archive email and other data to the native Microsoft Outlook PST file format. Restore selected Outlook PST files at any moment using built-in Outlook features or by replacing old corrupted PST files. Schedule and backup Outlook at specified time intervals or backup selected PST files manually. Most of our competitors software are backing up Outlook by simply copying PST files or making their shadow copies. If Microsoft Outlook is open while this takes place, this leads to many problems. PST files are copied without latest changes because Outlook locks up the PST file or because the backup software waits for Outlook to close. Shadow copies of PST files include information that was saved after the latest close of Microsoft Outlook only. Safe PST Backup uses sophisticated technology to access Outlook items directly and backs up latest changes (Incremental backup) in the background even if Outlook is open and you are working on something.

If you need help setting up personal Outlook backup click here to read help documentation or contact us and we will be glad to help.
To set up backup on corporate network please contact your network administrator or click here to contact our support representative.

Free version is available for download at: SafePSTBackup.com
You can find more information about Enterprise version here. Click here to download Safe PST Backup Enterprise Edition Administrative Guide.

Big news! Our First Application for iPhone and iPad is Finally Released

Remove duplicates from your iPhone / iPad Contacts in couple clicks, restore accidentally removed contacts. Find us on Apple App store. Try it out and tell us what you think!