How to use Email Responder
To download Email Responder please go to: www.e-mailresponder.com
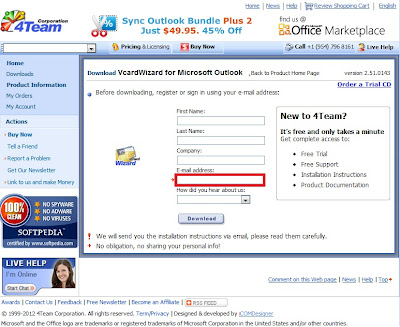
Click on “Try Email Responder for Microsoft Outlook”, enter your email address and press the “Download” button:

After installation you will see the Email Responder icon on the Outlook toolbar:

To start using Email Responder, please click the program’s icon and press “Start and Enable Email Responder service”:

After you enable the program you will see this button:

To set a status and personalize templates click the “Manage Statuses and Templates…” button:


Select a status and uncheck all other statuses you do not need:

To edit the a template please press the “Edit Auto Reply template” button:

Tip: If the “Auto Reply” field is unchecked, auto replies will not be sent.
If the “Auto Forward” field is unchecked, emails will not be forwarded automatically.
Edit the template and save it:

To send auto responses according to your status press the “Status” button and select the a status you need:

If you do not need to send auto replies anymore, you have to disable Email Responder by clicking this button:

Email Responder menu:
“Status”: Allows changing statuses
“User Defined Status”: After clicking this button, you will be able to see custom statuses:
“Disable Email Responder”: Disables Email Responder from sending auto replies to all incoming emails.
“Enable Auto Forwarding”: Allows creating auto forwarding rules and selecting other options (Remote Access, Save/Retrieve Options, Other).
“Open templates folder”: Displays all Email Responder templates.
“Filters”: You can select sending notification to email received on particular accounts, from particular senders. You will be able to select not to send notification to email that have certain words in the subject as well.
To set filters, press the "Add" button and enter email address or particular words:


If you want to remove an email address or certain words from filters, you need to mark email address/words and press the "Remove" button:

“Manage Statuses and Templates”: You will be able to personalize templates and create your own statuses after clicking this button.
“Options”: takes you to the same options as the “Enable Auto Forwarding” button.
“Help”: allows finding the online Email Responder documentation easily.
“About Email Responder”: dialog will display information about the Email Responder version you use, and options to: Deactivate the program, Buy Online, Check for Updates, Report a Problem, contact Tech Support or find the online documentation.

Click on “Try Email Responder for Microsoft Outlook”, enter your email address and press the “Download” button:

After installation you will see the Email Responder icon on the Outlook toolbar:
To start using Email Responder, please click the program’s icon and press “Start and Enable Email Responder service”:

After you enable the program you will see this button:

To set a status and personalize templates click the “Manage Statuses and Templates…” button:


Select a status and uncheck all other statuses you do not need:

To edit the a template please press the “Edit Auto Reply template” button:

Tip: If the “Auto Reply” field is unchecked, auto replies will not be sent.
If the “Auto Forward” field is unchecked, emails will not be forwarded automatically.
Edit the template and save it:

To send auto responses according to your status press the “Status” button and select the a status you need:

If you do not need to send auto replies anymore, you have to disable Email Responder by clicking this button:

Email Responder menu:
“Status”: Allows changing statuses
“User Defined Status”: After clicking this button, you will be able to see custom statuses:
“Disable Email Responder”: Disables Email Responder from sending auto replies to all incoming emails.
“Enable Auto Forwarding”: Allows creating auto forwarding rules and selecting other options (Remote Access, Save/Retrieve Options, Other).
“Open templates folder”: Displays all Email Responder templates.
“Filters”: You can select sending notification to email received on particular accounts, from particular senders. You will be able to select not to send notification to email that have certain words in the subject as well.
To set filters, press the "Add" button and enter email address or particular words:


If you want to remove an email address or certain words from filters, you need to mark email address/words and press the "Remove" button:

“Manage Statuses and Templates”: You will be able to personalize templates and create your own statuses after clicking this button.
“Options”: takes you to the same options as the “Enable Auto Forwarding” button.
“Help”: allows finding the online Email Responder documentation easily.
“About Email Responder”: dialog will display information about the Email Responder version you use, and options to: Deactivate the program, Buy Online, Check for Updates, Report a Problem, contact Tech Support or find the online documentation.


Comments
Post a Comment